So I started looking for something inexpensive, cheap, and fillable without disassembly. In brown. To go with the brown ink I plan on running in it.
Not much turned up in brown, that wasn't nitrate celluloid.
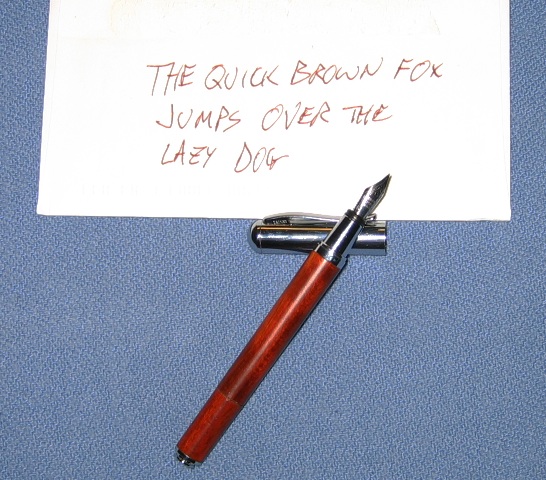
Then, somehow, something came up in some FPN thread, that sent me to HisNibs.com, where I spotted Pirre Paul "Woods." For $15.
$15 (cheap enough for a penbash; Hell, it's cheaper than a Pelikano!) and it's already (by virtue of having a wooden skin) brown? Count me in!
The first step was to get one. I'd already decided that instead of running a shaft out the butt, I'd cut off the end, to make a blind-cap, that would then become my fill-knob.
I figured that with my experience using a drill press as a poor-man's lathe, I could manage to get a perfectly square cut just by chucking the barrel in the drill press, running the table almost all the way up to the chuck, and applying a razor-saw, held flat against the table.
The results were better than expected: you would need to know where to look, in order to see what little scarring the chuck left, and the cut took at least ten or twenty times longer to make than it did to deburr.
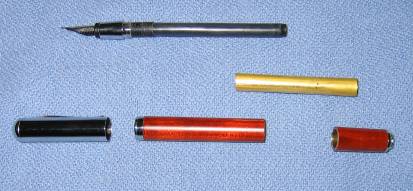
With the barrel cut, I could see the construction. The wood skin is about a milimeter thick, and it's wrapped around a brass tube. And there was absolutely no sign that anything was going to delaminate.
The next step was to find some brass tubing that would VERY SNUGLY telescope inside it: we obviously want to keep everything straight, and we don't want the damn thing pulling apart every time I posted and unposted the cap. Unfortunately, like all too many things, brass tubing comes in only two sizes: too big and too small. 3/8" was about the same size as the barrel itself, while 11/32 wasn't snug.
I tried coating the tubing with silver solder. It didn't build up anywhere near enough thickness.
I tried super-gluing shim brass. (I tried silver-soldering it, but it was so thin, the torch just made it shrivel up.) It went from not snug enough (one layer) to too snug (with a second layer).
As I was wrapping the tinned end of the tube with copper wire (with plans to silver-solder it, then turn it down to a snug fit), I realized that all my efforts to avoid "egging" the tube were blinding me to the answer:
Egg the tube intentionally.
So I inserted a piece of aluminum rod in the end, about a quarter of an inch, to keep the end round, and then gently egged the tube in a vise.
Success!! I now have a tube that will hold the pen together, yet allow the fill-knob (and the converter shank) to turn.
Now, I've got a Schmidt converter on the way.
In addition to the 11/32" tubing I'd already bought, I needed 1/4", 9/32", and 5/16" to make the coupler. Once everything was cut to length, and the coupler fabricated (the 3 new sizes of tubing telescoped and joined with cyanoacrylate adhesive) I ended up with this:
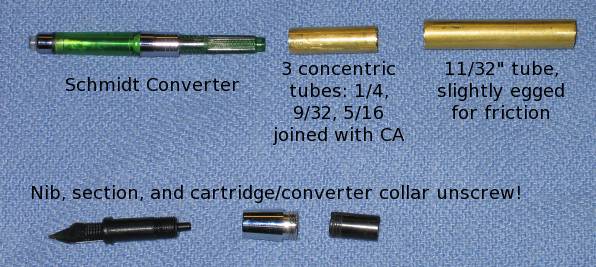
 It quickly became apparent that I needed to permanently attach the converter. As it turns out, in this pen, the nib/feed assembly screws into the collar where the cartridge/converter mounts, with the chromed section between.
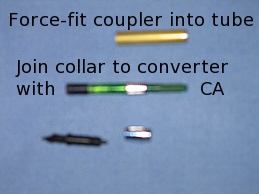
So I permanently joined the converter to the collar with a drop of cyanoacrylate adhesive. The coupler was just a force-fit inside the splice tube.
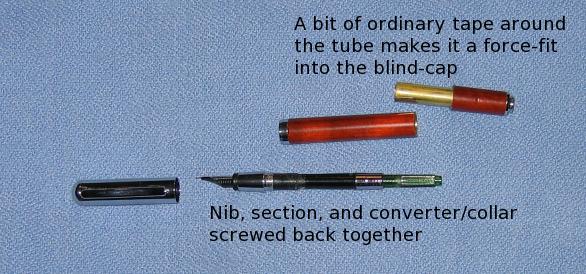
Once the converter/collar joint was set, I screwed the nib/section/converter assembly back together, and wrapped the splice-tube with ordinary tape to make it a force-fit inside the blind-cap, producing this (note that by this time, the converter has been filled, and I'm taking an awful risk of staining my blue blanket with brown ink).
Pelikan M150 (old style): 12.4g
Pelikan M200 (old-style): 15g
Penbash Mk.1 (Pelikano with converter shaft extension) 18g
Stock Pirre Paul Wood: 30.1g, with a mostly-full "Long International" cartridge
Penbash Mk.2 (modified Pirre Paul Wood, as shown above): 39g
I'd been having difficulties for some time, with not being able to feel whether I'd bottomed-out the plunger or fully withdrawn it, which kind of defeats the purpose of having the filling mechanism operable from outside the pen body.
So I had an epiphany: instead of brass tubing to couple the fill-knob to the converter shaft, what about rubber tubing?
So I went out to my car, and tried the spare piece of vacuum hose I keep in my trunk on for size.
It had a phenomenal grip. So strong a grip, in fact, that it pulled out the converter I thought I'd glued into its socket. Whoops!?!
This evening, I was working on an idea to secure it, when I realized that the converter nipple had pulled out of its own metal collar, which was still glued to the socket.
I discarded the collar, and this time, I epoxied the converter into the socket. (Note that the nib can still be unscrewed, and when you do so, the socket still slides right out of the section.)
I also put a slight keyway into the brass bushing that tied the shaft to the knob, intending to glue a bit of brass wire to the shaft, as a spline. Only to find that cutting the keyway, and rigidly attaching the converter into its socket, solved most of the "grip" problem, and I think a bit of water-based contact glue between the socket and the section should provide some extra grip there.
Already seems to be a distinct improvement over what it was in April.
Unfortunately, because of low ink capacity and a tendency to dry out, it was replaced in 2015 with a Pelikan M200 in clear "cognac."
![]()
Back Home
James H. H. Lampert
Copyright © James H. H. Lampert, 2011
Revised Friday, November 20, 2015
This Page URL: http://members.toast.net/JHHL/FountainPens/PirrePaulPenbash.html
Home Page URL: http://members.toast.net/JHHL/index.html