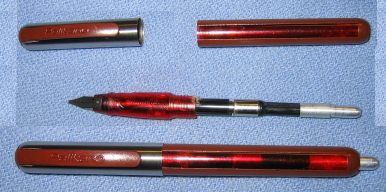
But I've already got Pelikan M200s in blue, green, and red (transparent demonstrator model), as well as a black/charcoal M150. I wanted a pen for brown ink (and still want one for purple), and I just didn't feel right shooting a coat of paint onto a beautifully finished $60-$90 pen. And nobody else seems to make anything comparable in brown or purple, at least at a comparable price.
So I decided to take matters into my own hands. In the modelbuilding hobbies (especially model railroading), "kitbashing" is the art of taking the parts from one or more kits, along with detail parts and scratchbuilding supplies, and building a model completely different from what the kit designer had in mind. So why not penbashing?
There are internal ribs in the blind end of the barrel, apparently to help seat the cartridge properly. Since my converter was now permanently attached to its socket, that wasn't a factor, and the ribs were interfering with the free movement of the fill knob. So I carefully reamed, filed, and carved until the ribs were no longer in the way.
Finally, it was time to paint. I used Testor's brown spray enamel, and I carefully masked off the smooth "window" area of the barrel, and both the stainless steel areas and the Pelikan logo button on the cap; I left the hilt unpainted, since (1) it would just wear off anyway, and (2) I didn't want to get paint onto the nib, or into the feed. After a day of field testing, I left it alone for 2 weeks, to dry thoroughly.
I'm delighted to be able to say that it works, and works quite well.
Unfortunately, the paint never really fully cured, and not long after, it was replaced with a penbashed Pirre Paul, which in 2015 gave way to a Pelikan M200 in clear "cognac."
![]()
Back Home
James H. H. Lampert
Copyright © James H. H. Lampert, 2011
Revised Friday, November 20th, 2015
This Page URL: http://members.toast.net/JHHL/FountainPens/PelikanoPenbash.html
Home Page URL: http://members.toast.net/JHHL/index.html