CONVERTING TO THE INTERNALLY REGULATED DELCO ALTERNATOR
The first step is to locate a good alternator for this swap. They are very common, and therefore inexpensive. I went down to my local parts house, and bought a brand new one from a 77 Chevy Pickup for less than the Motorola regulator would have cost me. While I was there, I picked up a simple $2.50 replacement plug for the wiring harness, a crimp connector, and a crimp on large ring terminal for a heavy gauge wire.
Before you start, remove the negative battery cable.
The next step is to label the wires coming off the current alternator. The ones you will be keeping are connected to the BAT terminal, and the AUX terminal. The other two terminals, GND and FLD, are only connected to the regulator, and will therefore not be needed.
Once the wires are marked, you can then remove the wires from the back of the alternator. Also, unbolt the regulator from the fender. The regulator should now be totally free, and can be discarded.
Remove the locking bolt, and the pivot bolt, and remove the Motorola alternator, and discard.
The Delco alternator should slip right into the mount. In fact, it fit better on my rig than the original did. You may have to loosen the lower bolt on the upper mount to allow it to move to accommodate the larger Delco alternator. Reattach and tighten the drive belt, and tighten all of the bolts to lock into place.
Strip the ends of the wires coming off the replacement plug. On the larger of the two wires, the red one on mine, attach the ring terminal. On the smaller of the two, crimp one side of the butt connector. Trim the ring off the wire that used to be connected to the AUX terminal, and strip. Crimp the other side of the butt connector to this wire. Plug the connector into the side of the alternator, and connect the two wires, previously connected to the BAT terminal, and the red wire from the connector to the post on the back of the alternator. Make sure all of your connections are tight, a loose connection could cause a fire.
Reconnect the negative battery cable, and start the engine.
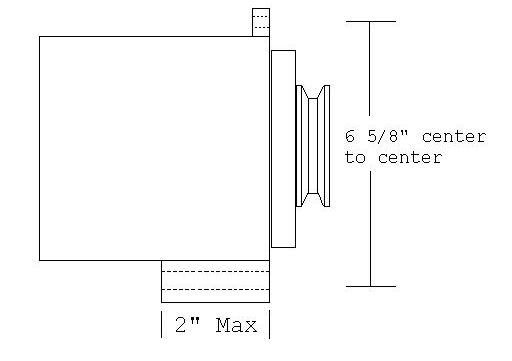
Here is a drawing of my alternator with the critical dimensions. Also here are some part #'s that you should be able to use to get the correct alternator. I am not recommending these companies, just using their part #'s to give you a reference point to find the correct alternator:
NAPA: 3107127-3
AL's AUTO SUPPLY: 7127-3, AND 7127-9
The number after the dash is the clock position of the two pin plug on the side of the alternator.
NOTE: The new alternator will put out over 60 amps maximum, but that does not mean that all of the wiring will take an increased load. When adding new electrical components always run new wiring that is large enough to take the added load.

BEFORE
AFTER