Some Lessons Learned
I have just finished tinkering with my stock Aisan carb for countless hours over the past few months - and got it working! After trying almost everything else, it seems the problem lay in the main throttle plate rods wearing enough to allow air to suck through them at idle. But there are lots of other things that could have been wrong.
While the details of this Aisan carburetor and how to mess with them are still right in short-term memory, I thought I would share it to those like me, non-professional mechanics that just want a reliable and fun car to get where we need to get, and that prefer a stock-like fuel delivery system.
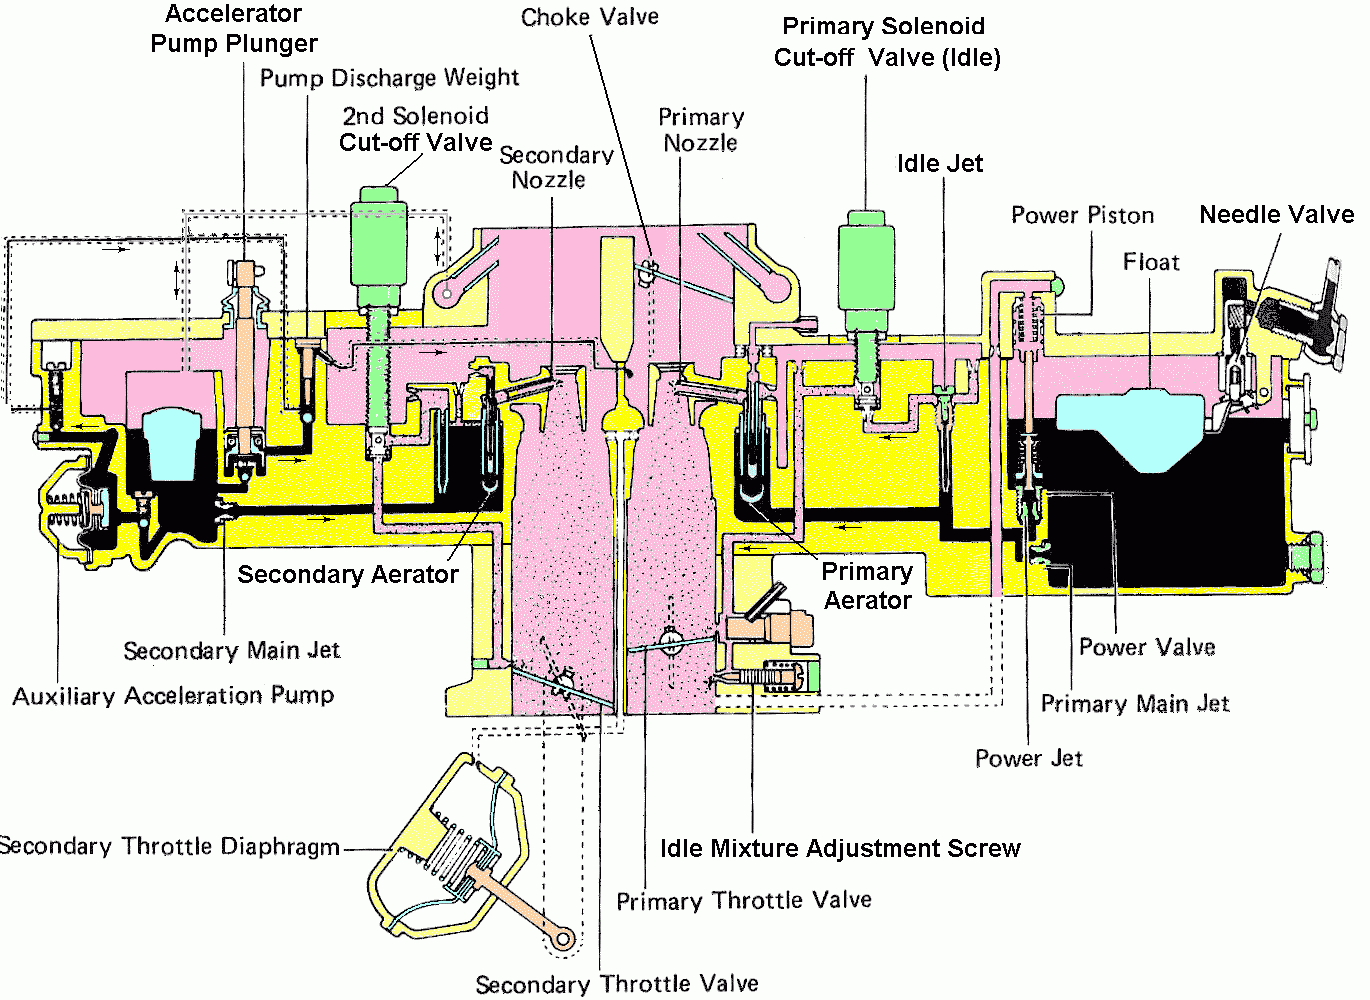
First step, I recommend my enhanced schematic, located here:
http://members.toast.net/ahines/CARB3.gif
It’s a modified version of the one in the
I’m going to assume you have the service manual. Because without it, you won’t be able to do much in the way of fixing it.
Secondly, here are the normal modes of operation that the diagram covers (best I can see).
Idle
At idle, the throttle valves are very nearly shut. This means the engine suck produces a healthy vacuum below the throttle plates (and maximizing the potential for vacuum leaks). Pressure above the throttle plates is close to atmospheric, so fuel is not sucked by the main nozzles (venturis). An oblong port below the main or primary throttle valve therefore sucks fuel through the idle jet, then through the idle cut-off solenoid, then down through idle Mixture Adjustment Screw (MAS) housing into the throttle body, and finally in your intake manifold. The MAS is a simple needle type screw valve that adjusts how much fuel flows in response to the vacuum.
Access to the MAS is essential to properly tuning up your 4AC. You have to remove an idiot plug that only lawyers and politicians can see any advantage to. To remove it, you have to have the carb in hand with the two double diaphragms pointing downward. You can set the throttle body flange on a 2x4 and use a hand drill to drill through the plug. As recommended by the service manual, I was successful using a two step procedure that first drills through the plug with a smaller diameter bit. Try not to push hard on the plug or you will lose your 1mm clearance between the MAS and the plug. Once your drill bit breaks through the plug, use a small screwdriver to fully tighten the MAS (about 3-3˝ turns for me), counting the number of turns. Write down on a big piece of paper how many turns so you can return the MAS to about normal after the plug is out. Tightening the MAS down all the way gives you more clearance to finish drilling out the plug and less chance to mangle the MAS. The plug is about a tenth of an inch thick (2.5 mm).
If your engine does everything right but idle (like mine), then the number of problems that can be going wrong is pretty limited. Your idle jet could be bad, your idle cut-off solenoid could be faulty, your mixture could be off, or you could be leaking air below the throttle plates somehow. More on this later.
Accelerator
When your vehicle is off, there is only one way you can get gas to move through the carb – with the accelerator. It’s pretty easy to verify that your accelerator works. With the engine off, take off the air filter cover and pull the throttle lever up a bit. Then, hold open the butterfly valve and shine a flashlight down that side of the carb. Next, give the throttle lever a couple of quick flicks. You should see the fuel squirt into the throat. If you don’t, you have a problem.
First thing to check is on the outside. Remove the air filter and check the accelerator linkage and lever. When you twist the throttle lever, that should make the little see-saw move up and down. That in turn is essentially just a squirt gun; that forces a piston to move gasoline through a calibrated flow valve and into the primary barrel. If the outside mechanisms still do their duty, you’ll have to pull open the carbie to fix it. More than likely, you need a new ball in the bottom of your plunger tube. Or maybe your plunger is just shot and doesn’t force the gasoline through the tubes anymore. Either way, a standard carb rebuild kit is your friend.
There is also an auxiliary acceleration pump. It bypasses the main accelerator pump and provides another means of fuel squirt through the accelerator nozzle during engine operation. This is actuated from the N port of the vacuum tree “as needed”. There is a check procedure on page EC-51 of my ’84 AE86 service manual.
Primary and Secondary Nozzles
The two venturis and nozzles in your carb are identical in theory. When air moves, its effective pressure is reduced. So if we open the throttle and let the engine suck air, then pressure in the barrel is reduced. The carburetor amplifies this effect by adding a venturi. We count on fuel being at a certain level in the bowl. The amount of pressure drop caused in the venturi by the moving air sucks fuels upward from the bowl to a higher lever. And the nozzle is located just above the regular bowl level. The more air we move, the harder the venturis suck and the more gasoline flows through the nozzles into your thirsting engine.
That is the concept – self adjusting and no moving parts! In reality, we add several things to muddy the waters and hopefully improve performance. First, we find dripping gasoline doesn’t vaporize as quickly as we would like, meaning it won’t burn completely in the cylinder. So each side of the carb (primary and secondary) has an aerator (foamer) that bubbles in air, putting oxygen as close to every fuel molecule as we can. Also, if we only had a bowl and tube, then every time we turned a corner, our fuel level would slosh around, making the mixture go haywire. The two “jets” at the bottom of the bowl are really just little restrictors that minimize how quickly these level fluctuations impact the fuel level felt by the nozzle. Having our jets free from garbage is a good thing. Having particles of deteriorating rubber and other debris plug the jets is common enough that Aisan added two screw plugs in the side of your fuel bowl to let you clean or replace the jets without pulling the carb apart. These are the two 14mm bolts below and on each side of the fuel level window. Don’t forget when you remove one that your fuel bowl will empty. Once the 14mm screws are out, you’ll see the jets looking like hollow screws on the far wall of the bowl. You can clean the jets by poking through them with soft wire (brass or aluminum). My carb rebuild kit did not come with replacement jets, so when you do a rebuild, you should unscrew the jets and clean them thoroughly.
So, the nozzles only operate when air is moving through the throat, i.e., above idle speed. In gentle driving, only the primary is providing fuel and air. The second nozzle kicks in when you ask for more air and gas than the primary can provide. This takes place through a vacuum actuation. If you play with the throttle lever and watch the secondary throttle plate, you’ll see that your secondary throttle will NEVER open unless your secondary throttle diaphragm is sucked upward (by low venturi pressure, i.e. a strong air flow through the carburetor) AND your throttle lever is engaged beyond a certain angle. This explains why your secondary barrel is so spic and span while your primary is so nasty – because the lazy bum hardly ever gets called into service. If you find the two fingers on the secondary throttle rod, at the base of the diaphragm’s connecting rod, they trigger the release and rotation of when your secondary opens. You can adjust them by bending those fingers. Anyway, that diversion to say that your secondary nozzle and jet are not usually the guilty party. They may need to be cleaned, but your engine can still run fine without them, although your top end will not have the design power.
There are a couple of typical symptoms that you have a problem with your primary fuel delivery. One is you are fuel starved, if you roll along and keep your foot down on the pedal, you lose power. Pumping the pedal will let you limp along, since you'll be living off the accelerator instead of the main nozzles. The other side is you may have too much fuel dumping in, usually because your fuel bowl is overflowing. You'll smell that problem.
Can you see fuel in your view glass? If not, either it's too high, flooding the car, or too low - not letting enough gas in. Once the level is off the glass, you probably can't tell if it's too high or too low. But either way, you'll have to open the carb. Too high means either your float valve is stuck open or, more likely, your float is saturated and no longer floats. If the level is too low, probably your valve is plugged. (this assumes the problem is a carb problem, not that you're out of gas or need a fuel filter/pump) If the level is normal, you probably need to poke out your jets. As a last resort, you may need to pull the venturis so you can access, clean, and/or replace the nozzles.
“Power” Mode
Another feature “muddying the waters” of normal operation is the power piston and jet. This is integrated with the primary side and simply augments the nozzle pressure when you “kick it.” A sudden rise in lower throat pressure sends a signal to thrust the power piston. This sends a temporary pulse of fuel (additional to the accelerator pump) through the primary nozzle and, hopefully, prevents hesitation when you punch it. My rebuild kit contained a new power valve / jet assembly.
Miscellaneous Hopefully Helpful
Hints
Assuming you can idle, setting the mixture is really easy. Run at idle (700 RPM recommended) and only twist the MAS until your engine runs as fast as possible. That’s it! Tightening the screw shuts the valve, leaning the mixture. Opening the valve richens it. At the ideal mixture of fuel and air, you get the most power and hence RPM’s.
After working on the carb, it helps in getting it started again if you fill the bowl. Trying to fill it through the convenient primary vent tube results in fuel running to the vacuum switching valve port. You can fill it more effectively (but less easily) with the secondary vent tube. It is even easier to fill the bowl through the big charcoal canister vac tube. I use a little honey bear bottle to squirt the gas in it.
Do not laugh at the pictures showing little tags on all the vacuum lines. You need this. If you laughed and need help, look on page EC-3, 4 and 5 of the AE86 service manual. Do not laugh at the instructions to cover your intake manifold with a towel after you pull the carb either. You don’t want to need this one. Service manual won’t fish out hex nuts for you.
Be gentle with the little plastic eyelets that your connector rods slide in! They’re brittle and I can’t find a source for replacing them.
Your carb screws may not have been budged for 25 years. Use penetrant liberally and push hard on your screwdriver. Sheared off screws are not fun (personal experience speaking here.)
If you do a vacuum delete, you shouldn't delete the hose running from the vacuum tree to your auxiliary accelerator pump. If you do, you'll lose that helpful (but non-essential) feature. Besides, a leak here won't make your engine run poorly. The real culprits are the group feeding in below your throttle valve. These are the ones down by the wire connector to your intake heater.
There are many ways air can leak into your throttle body. It will usually give you a hard start and/or rough idle. While idling the engine, spray carb cleaner in short blasts around the throttle body. If your engine speed changes when you do that, you’ve got a leak there. Common places include around the two ends of the primary throttle rod, and above and below the heater that seats between the throttle body and intake manifold. Because the heater is bakelite or something, I didn’t want to torque down too heavy on the four mounting bolts. I ran a small but continuous bead of high temperature grease (brake grease) on the top and bottom to help seal it up. Haven’t heard pro or con on this practice, but I suspect there is not a problem since the intake heater has been sitting in engine grease for 25 years. I have been told high temperature silicone grease if available that will seal it.
Check your solenoids by simply applying 12 volts to them. The primary solenoid has two wires. Follow them into the green connector and use a wired roach clip to grab the ground terminal. Then briefly apply 12V from the battery to positive terminal. You should hear/feel it click. The secondary solenoid only has a positive wire. Give it 12V (and ground the body if your carb is off the engine) and you should get the click. If not, double check you’re on the correct terminals in the connector. If still no click, you need to replace it. Junkyard carbs usually have good solenoids.
While the carb is off, go ahead and spend the $5 and 20 minutes to replace your fossilized vacuum lines. It will eliminate a lot of variables in the hunt.
And lastly, while it can seem like it sometimes, this is not black magic! Try to isolate when your engine is naughty and when it’s nice and look for the things that pertain to the modes it runs poorly in.
How much will it cost? That depends on the exact problem. I had a worn out throttle shaft – one of the “uh oh” problems with old carbs. I spent $75 for an incomplete junkyard carb (which was too much, but it still provided me the chance to disassemble and reassemble several times before tearing into the real thing, and gave me a set of spare hard parts to choose the best from), $28 for a rebuild kit from Advance Auto for all the soft parts and most of the valves and plungers (which didn’t really have to be replaced), probably another $30 on vacuum lines, several carb cleaners, and this and that.
In the end, I swapped out the whole throttle body for the junkyarder. It’s not going to last as long as I own the car. But it will give me enough time to find a replacement carb from an old wrecked Nova or Chevette or Corolla that will. And swapping out carbs? That will only take me an hour now!