Once you've gathered the materials, you're ready to begin.
1. Using the 1/4" x 1" balsa and the 1/2" x 1" balsa, and the yellow glue, laminate up two SIDE TOWER CORE BLOCKS, 1" x 3/4" x 3 1/2". It's up to you at this point whether to cut them to final length before or after laminating them, but make absolutely sure they're lined up as precisely as possible, clamp the pieces securely, and wipe off any glue that oozes out. (To cut to length, use a razor saw with a precision mitre box.)
2. While the SIDE TOWER CORE BLOCKS dry, begin cutting out the major parts of the outer basswood skin. Use the 1/16" sheet basswood, laying out the parts with the ruler and square, and cutting them out on the cutting mat, using the steel ruler to guide the razor blade. Check your measurements as soon as you cut out the pieces; ripping (i.e., along the grain) cuts have a tendency to wander, no matter how careful you are, and even crosscuts can miss the mark. If a piece is too big, simply trim it to size; if it's too small, save it, and cut smaller parts from it. UNLESS OTHERWISE NOTED, THE GRAIN SHOULD RUN ALONG THE LONGER SIDE!
a.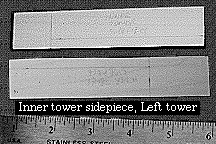 Two pieces, 1" x 5". Once cut, draw a crosswise line on one side, one
inch from one end, and another one on the other side, 1 1/2" from the
opposite end, and on each side, draw a lengthwise line 1/4" in from the
edge, making sure the two pieces are MIRROR images of each other (see
pictures). These are the marks you should use for staining the parts.
While you're at it, mark each of the pieces as shown, "TOWER INNER
SIDEPIECE."
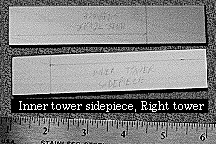 (Note that this is the only piece that has large exposed
areas on both sides.)
b. Two pieces, 1" x 3 1/2". Draw a lengthwise line on each piece, 1/4" in from the edge, one side only, and mark each piece "TOWER OUTER SIDEPIECE."
c. Two pieces, 1" x 1 1/8". Draw a lengthwise line, 1/4" in from the edge, one side only, and mark each piece "TOWER TOP."
d. Two pieces, 1" x 1 1/16". Mark each piece "TOWER BOTTOM."
e. One piece, 1" x 1 3/4". Draw a lengthwise line, 1/4" from the edge, and mark the piece "CENTER TOP."
f. One piece, 5/8" x 1 1/16". Mark it "MUSIC DESK."
g. Two pieces, 1/4" x 3/4". Mark each one "STOP JAMB."
h. One piece, 7/16" x 1 1/16". Mark it "KEY SUB-BED."
3. Since the tower cores probably haven't dried yet, you may as well pre-drill the stop-jambs now, as (based on my own experiences with the prototype) it will probably save you some grief later. Use the suggested stopjamb layouts given in the plans (which assume five stops, including a coupler, for each manual, four stops, including two couplers, for the pedalboard [lower left jamb] and a zimbelstern, tremulant, and blower switch [lower right jamb]) or design your own; just remember that there really isn't enough room for the pipework to correspond with the stops shown on the plans, let alone the sort of huge, bristling stopjambs you might find at (say) the Crystal Cathedral. Once the stops are laid out, use the drill bit and the pinvise to drill pilot holes for the stops (remember to back up the workpiece with a piece of scrap wood, when drilling holes!).
4. Stain all the basswood parts you've cut out so far. On each TOWER INNER SIDEPIECE, stain the side and end edges, 1" section and 1/4" strip on one side, and 1 1/2" section and 1/4" strip on the other side, and leave the rest unfinished to maximize glue adhesion. On the other parts that have a 1/4" strip marked, stain the edges, entire unmarked side, and 1/4" strip. On the stopjambs, stain the edges and whichever side you want facing outward (first removing any pencil marks from that side!). On the remaining parts, stain the edges and unmarked side only. Leave the parts to dry overnight.
5. By this time, the TOWER CORE BLOCKS should be dry. If you haven't cut them to the finished 3 1/2" length, do so now. Then find the smoothest of the two 1" x 3 1/2" faces on each block, and paint those faces black. Leave them to dry overnight.
6. Begin the CENTER CORE BLOCK by gluing two 4" pieces of 1/4" x 1" balsa, edge to edge, and clamping until dry (overnight recommended). Also edge-glue and clamp two 2 7/8" pieces of 1/2" x 1" balsa. Wipe away any glue that oozes from the seams after clamping.
7. Cut out the MANUAL KEYBEDS from the birch plywood, using the razor blade and straightedge, razor saw, or a small power saw. Cut them out slightly oversize, then sand and/or shave to the finished sizes. Sand the undercuts for the front edges, then glue, align, and clamp them until dry (overnight recommended; make sure the clamping pressure is applied evenly to the entire surface, to avoid warping.
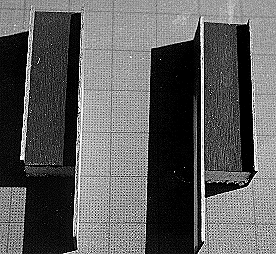 8. By this time, the stain on the basswood parts, and the paint on the
TOWER CORE BLOCKS, should be quite dry. Begin assembling the side towers
by applying glue to the sides (i.e., 3/4" x 3 1/2" faces) of the blocks,
and setting them, black side up, on the workbench. Take the two TOWER
INNER SIDEPIECES so that the 1/4" strips are facing up, and glue them to
the sides of the core blocks, so that the 1 1/2" stained end sections
are exposed below the bottoms of the blocks, on the side facing the
blocks, and the opposite ends are exactly even with the ends of the
blocks. Then glue the TOWER OUTER SIDEPIECES in place so the ends are
exactly even with the ends of the blocks, the 1/4" stained strips are on
the side facing the blocks, and the fully stained sides face away from
the blocks. At this point, the two towers should be MIRROR IMAGES of
each other, and should look like the picture.
Clamp everything in place, as the SIDEPIECES have a very strong tendency to warp, and allow the glue to dry overnight.
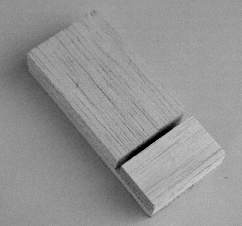 9. While the towers are drying, continue with the CENTER CORE BLOCK by
cutting, shaving and sanding both parts of it it to the finished width
of 1 3/4". Remove the material from one side only; you WANT the seams to
be off-center. Cut a 1 3/4" piece of 1/2" x 1" balsa, and glue it across
one end of the 1/4" thick section of the core block; take the 1/2" thick
section of the core block, and glue it on, staggering the seams, and
leaving a gap that will just fit the keybeds. At this point, the core
block should look like the illustration shown at the right:
(note that the gap is empty in the picture; while the glue is drying, they should
be inserted in the gap, to maintain the proper gap size.)
Line everything up, so that the sides and ends of the 1/2" thickness
match the sides and ends of the 1/4" thickness, put a couple of large
blocks of scrap wood on top to protect the keybeds (making SURE you
haven't glued THEM in place), then set a large, heavy object on top, to
hold everything in place until the glue dries, preferably overnight.
10. By this time, the towers should be dry; glue and clamp the TOWER TOPS and TOWER BOTTOMS in place overnight.
11. If necessary, do any final sanding to adjust the finished CENTER CORE BLOCK to its finished size, then cut out the CONSOLE FRONT from 1/4" sheet basswood, as shown in the plans. You will need to cut out the opening for the manuals and music desk by drilling 1/4" holes near the corners, then using the coping saw. Cut the opening slightly undersize, then shave and sand it to the finished size. Make sure the bottom of the opening in the CONSOLE FRONT lines up with the bottom of the gap in the CENTER CORE BLOCK, as shown on the plans, and that the KEYBEDS slide easily through the opening, and into the gap in the core block. Mark the point where the top of the CONSOLE FRONT reaches on the front of the CENTER CORE BLOCK.
12. Stain the front, top edge, and opening edges of the CONSOLE FRONT to match the rest of the stained parts, and paint the front of the CENTER CORE BLOCK black. Let everything dry overnight.
13. Cut two WINDCHEST FRONTS from 1/4" square basswood strip, to exactly fit between the tower sidepieces, as shown on the plans. Stain, and set aside.
14. Remove the KEYBEDS, and glue the now complete SIDE TOWERS and CONSOLE FRONT to the CENTER CORE BLOCK, clamp, wipe away any seepage, and allow to dry overnight.
15. Cut out the TOEBOARD and HEELBOARD templates from the KEYBOARD SHEET, and use them to cut out those parts of the pedalboard from 1/16" basswood. Also cut a PEDALBOARD BASE and two PEDALBOARD SIDEPIECES to match the shapes given in the plans. Adjust the parts until they fit together properly, as shown in the plans, then stain the TOP and END edges of the TOEBOARD, the TOP edge and OUTSIDE face of each PEDALBOARD SIDEPIECE, and the TOP and END edges and OUTSIDE face of the HEELBOARD. Allow the stain to dry overnight.
16. Adjust the fit of the CENTER TOP, if necessary, then glue it to the top of the core block, between the two towers. Then glue the STOP JAMBS into place (making sure the pilot holes don't fill up with glue). Clamp overnight.
17. Glue the TOEBOARD, PEDALBOARD SIDEPIECES, HEELBOARD and PEDALBOARD BASE together to form the PEDALBOARD FRAME. Tape together overnight.
18. If the exposed edges of the TOWER SIDEPIECES, TOWER TOPS, TOWER BOTTOMS, CENTER TOP, CONSOLE FRONT and WINDCHEST FRONTS are noticeably misaligned, correct by shaving and/or sanding, then touch up the stain.
19. Drill each of the pilot holes in the STOP JAMBS all the way through the CONSOLE FRONT. Either stain the KEYBEDS, or paint them black, and allow them to dry overnight.
20. Mark the centerline of the pedalboard frame, then mark all the NATURAL notes on the backside (i.e., the side that will attach to the console front) of the toeboard. Working your way out from the center, cut the 19 NATURAL notes of the pedalboard from 1/32" x 1/8" stripwood, and glue them in place, inserting 1/32" thick spacers between them at the heelboard, and "eyeballing" the spacing at the toeboard. Be sure to follow the contours of the toeboard and heelboard! If you cut a pedal too long, shorten it to fit; if you cut one too short, break it in two, and use the pieces as spacers. Allow the pedalboard (and your nerves) to dry overnight.
21. Cut the 13 SHARPS for the pedalboard, to match the template given on the KEYBOARD SHEET. Either stain them, paint them black, or leave them natural, according to personal preference. While waiting for the sharps to dry, sand the naturals to the correct contour. Once the sharps are dry, glue them between the naturals, in the customary arrangement. This is by far the easy part of building the pedalboard.
22. Glue the KEY SUB-BED to the bottom of the keybeds, with the edge 3/32" in from the edge of the lower manual, as shown in the plans. Clamp overnight.
23. Glue the KEYBEDS into their slot, inserting them until the KEY SUB-BED buts up against the CONSOLE FRONT. Cut a piece of 1/8" square stripwood to the same width as the keybeds, and stain two adjacent sides. Glue it in place as shown on the plans. Bevel the top and bottom edges of the MUSIC DESK, then glue it in place, as shown in the plans. Let everything dry overnight.
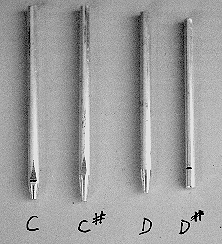 24. Make the facade pipes, according to the dimensions given in the
table. If 5/32" rod is unavailable, use 5/32" tubing that will
telescope over 1/8" rod, and super-glue it in place over the rod. Cut
the pipes to the specified overall length, mark the speaking length,
then form the foot of the pipe using a jeweler's or modelbuilder's
lathe, or by chucking the rod in a drill press (or a power drill clamped
in a bench vise), and filing it to shape as it turns. WEAR EYE
PROTECTION, AND MAKE SURE THAT IF A TOOL GOES FLYING, IT WILL GO THROUGH
A WALL, AND NOT YOUR BODY!. Also, don't bother forming a conical foot on
pipes of 1/16" or smaller diameter. Once the foot has been formed, file
a flat area for the mouth of each pipe. Also, make sure the low C and C#
pipes will fit the side towers, cutting off excess material from the
FOOT, NOT the BODY. After all the facade pipes are complete, paint in
the mouth and open top with Floquil engine black, and a 10/0 or finer
brush. (Note: Floquil paint is specified because it sticks extremely
well to bare metal. Also note that it contains much stronter solvents
than most model paints; USE IN A WELL-VENTILATED AREA!) See the picture: The C pipe is completed; the C# pipe is shaped but not yet painted; the D pipe has the foot turned, but the flat area around its mouth has not yet been formed; the D# pipe has been cut to length, but not shaped. Once the pipes are finished, allow them to dry overnight.
25. Lay the model on its back, on the 1/16" plywood, and trace its outline. Cut out a BACK PANEL to that outline (cutting it slightly oversize, so it can be sanded to its finished size), and also cut a 2 1/8" x 2 1/2" BASEPLATE from the plywood, sanding the edges smooth. Glue the BACK PANEL in place, and allow it to dry overnight.
26. Once the glue has dried on the back panel, shave and sand it to finished size, then stain it and the BASEPLATE to match, touching up any damaged stain in the process. Again, allow it to dry overnight.
27. Spray on the first coat of lacquer to the casework, and also lacquer the KEYBOARD SHEET (specifically, the manuals and the nameplate). Cut out the manuals and nameplate using the razor blade and steel ruler, and glue them in place.
28. Use the windchest layout diagram to lay out the pipes in the order in which they are to be installed. I recommend double-stick tape to hold them in place on the diagram until needed. Use the 5-minute epoxy to glue each pipe into place, working from left to right in the left tower, right-to-left in the right tower, and from the outsides in in the center case. Mix the epoxy in small batches on something expendable, using a toothpick; when a batch starts to "go off" (it will stiffen and heat up), discard the unused epoxy and mix another batch. "Hot glue" will also work, but I consider epoxy to be more secure.
29. Center the organ and pedalboard on the baseplate, and glue everything together. Select at least as many pins as you have holes in the stop-jambs (and a few more, in case you bend some), insert them in a scrap of balsa, and paint their heads (and about 1/8" or more of the shafts) using Floquil engine black. Allow everything to dry overnight.
30. Insert the pins in the holes, leaving only enough shaft exposed to realistically represent stop knobs. Use needle-nose pliers. Once all the stops are inserted, touch up any damaged black paint, and let them dry for at least an hour. Then, use Floquil reefer white to paint the fronts of the heads. Allow everything to dry overnight.
 31. Apply 2-4 additional coats of lacquer to all sides, and allow to dry
several hours. Then, after shaking the jar well, to disperse the flatting agent evenly, carefully apply Testors Dullcote lacquer to the exposed areas of the core blocks, to remove the shine. Note: Testors Dullcote is specified because it dries dead flat, and is (among modelbuilders) considered the most effective way to eliminate unwanted shine.
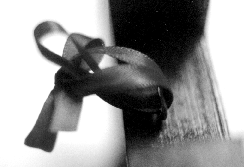
32. If this is going to hang on a Christmas tree, drill a 1/16" hole in the top of the center case, 7/16" from the front edge and centered between the side towers, drive in the screw-eye, and secure it with a drop of super glue. Then, form a hanging loop from the ribbon tying a bow at one end, and securing it by sewing s few stitches through the center of the knot. Attach the hanging loop to the eyebolt using a "lark's head" knot, as shown, and pull it tight, with the bow centered at the top of the screw eye.